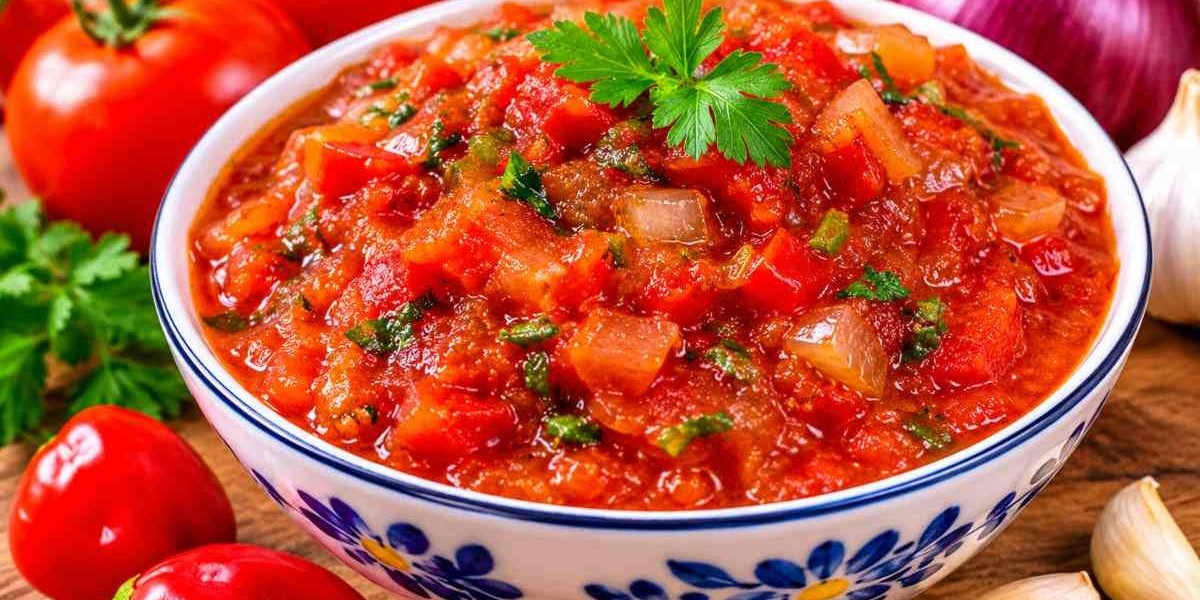

There is a moment at almost every East African table when someone slides a small bowl of glossy, brick-red sauce across the cloth and says, "Try this, but go slowly." You tear a piece of bread, dab a little on the edge, and suddenly the whole plate wakes up. Smoky, garlicky, tangy and properly hot, that sauce is Pilipili ya Kukaanga, and once you have a jar of it in your fridge, plain rice, grilled meat, eggs and even boiled potatoes stop feeling plain.
This guide walks you through everything: what the sauce is, where it fits in Swahili and Kenyan home cooking, a tested step-by-step recipe, smart variations, serving ideas, storage and food safety, and a detailed FAQ. I have been cooking East African food for my family for years, and the notes below come from real kitchen trial and error, including the batches that came out too oily, too bitter or far too hot to eat.
What Is Pilipili ya Kukaanga?
Pilipili ya kukaanga is Swahili for "fried chili." In practice it is a cooked chili condiment made by frying fresh red chilies with onions, garlic and ripe tomatoes in oil until the mixture turns thick, deep red and fragrant. A squeeze of lime at the end brightens everything. It is part relish, part hot sauce, and part cooking base.
The Short Answer
What it is: a Swahili-style fried chili and tomato sauce.
Main ingredients: red chilies, onion, garlic, tomato, oil, salt and lime.
Texture: thick and spoonable, somewhere between salsa and chutney.
Taste: hot, savory, slightly sweet from the onions and tomatoes, with a tangy finish.
Best for: grilled meats, rice dishes, flatbreads, eggs, fries and sandwiches.
Keeps for: about 7 days in the fridge when stored properly.
Where It Comes From
Chili peppers arrived on the East African coast through centuries of trade across the Indian Ocean, and the Swahili coast absorbed them into a cuisine already built on coconut, cardamom, cloves, cumin and tamarind. Fried chili condiments of different kinds now appear across Kenya, Tanzania and neighboring countries, and every household has a slightly different version. Some cooks keep it chunky and rustic, others blend it smooth. Some add a spoon of tomato paste, others rely on fresh tomatoes only. There is no single "correct" recipe, which is part of the fun.
How It Differs From Other Chili Sauces
If you already know sambal, harissa, salsa roja or Nigerian stew base, you will recognize some familiar ideas here. The key differences are:
It is fried, not raw. Cooking the chilies in oil softens the raw bite and builds a rounder, sweeter heat.
It is built on onion and tomato. That gives body and natural sweetness that a plain chili paste lacks.
It stays fresh-tasting. There is little or no vinegar, so the flavor leans on lime and garlic instead of sourness.
It is flexible. You can spoon it on at the table or use it as the start of a stew.
Ingredients and Why Each One Matters
A short ingredient list means every item counts. Here is what goes into the pot and what each one does.
The Core Ingredients
8 to 12 fresh red chilies (about 100 g): the heart of the sauce. Red finger chilies give color and moderate heat, while bird's eye chilies add serious fire. A mix of both is my favorite.
2 large red onions, finely diced: they melt into the sauce and provide sweetness and body.
4 garlic cloves, minced: for aroma and depth.
1 tablespoon grated fresh ginger: adds warmth and a clean, peppery note.
3 ripe tomatoes, finely chopped: they supply moisture, acidity and that rich red color.
1 tablespoon tomato paste: deepens the color and balances watery tomatoes.
⅓ cup neutral oil (sunflower, canola or vegetable): the frying medium, and also a natural preservative layer on top of the jar.
1 teaspoon salt, adjusted to taste.
½ teaspoon ground cumin and ¼ teaspoon turmeric (optional): classic coastal flavors that add warmth and a golden undertone.
Juice of 1 lime: added at the end for brightness.
A small handful of fresh cilantro, chopped (optional): for a fresh finish.
Choosing the Right Chilies
Heat varies enormously from pepper to pepper, even within the same variety. Taste a tiny piece of your chili before you start so you know what you are working with. If you want mild flavor with plenty of color, use more red finger chilies or even a few red bell peppers and just one or two hot peppers. If you love heat, add extra bird's eye chilies. Removing the seeds and white membranes lowers the heat noticeably without changing the flavor much.
Smart Substitutions
No fresh red chilies? Use green chilies and the sauce will be greener and a little grassier. You can also use rehydrated dried chilies.
No ginger? Skip it, or add an extra garlic clove.
No fresh tomatoes? Use one cup of canned chopped tomatoes, drained.
Allergic to or avoiding nightshades? This sauce is built on nightshades, so it will not suit that diet.
How to Make Pilipili ya Kukaanga at Home
This is the method I use every week. Plan on about 30 minutes from start to jar.
Step 1: Prep Everything First
Wash and dry the chilies. Remove the stems. For a milder sauce, slice them open and scrape out the seeds. Finely chop the chilies, onions and tomatoes, and mince the garlic and ginger. Wear gloves or wash your hands thoroughly with soap afterward, because chili oils linger on skin and can sting your eyes for hours.
Step 2: Fry the Onions Slowly
Heat the oil in a wide, heavy pan over medium heat. Add the onions and a pinch of salt. Cook for 6 to 8 minutes, stirring often, until soft and just turning golden. Do not rush this part. Onions that are still raw will make the finished sauce taste sharp instead of sweet.
Step 3: Add the Aromatics and Chilies
Stir in the garlic and ginger and cook for 1 minute until fragrant. Add the chopped chilies, cumin and turmeric. Fry for 3 to 4 minutes. The kitchen will smell wonderful, and you may cough a little, so turn on the extractor fan.
Step 4: Cook Down the Tomatoes
Add the tomatoes and tomato paste. Turn the heat to medium-low and cook, stirring occasionally, for 10 to 12 minutes. You are looking for three signs that it is ready: the tomatoes have broken down completely, the sauce has darkened to a deep red, and a layer of red-tinted oil has begun to separate around the edges.
Step 5: Finish With Lime and Taste
Remove the pan from the heat. Stir in the lime juice and cilantro. Taste and adjust. Add salt if it tastes flat, more lime if it tastes heavy, or a pinch of sugar if the tomatoes were very acidic. The flavor should be hot but balanced, never just burning.
Step 6: Choose Your Texture
For a rustic, chunky sauce, leave it as is. For a smoother result, blend it briefly with a stick blender, but pulse only, because over-blending makes it look pale and loose. Spoon it into a clean, dry jar while still warm.
Pro Tips From My Kitchen
Use a wide pan. More surface area means the water evaporates faster and the flavors concentrate.
Do not burn the garlic. Burnt garlic turns bitter and cannot be fixed.
Add oil gradually if you prefer a lighter sauce. Start with ¼ cup and add more only if the pan looks dry.
Let it rest. The sauce tastes noticeably better after a few hours, once the flavors settle.
Flavor Variations to Try
Once you have the base recipe down, Pilipili ya Kukaanga becomes a canvas. Here are the variations I make most often.
Smoky Roasted Version
Char the chilies and tomatoes under the grill or on an open flame before chopping. This adds a campfire flavor that pairs beautifully with grilled meat.
Coconut-Kissed Version
Stir in 2 tablespoons of thick coconut milk at the end. The sauce becomes slightly creamy and softens the heat, which makes it kinder to guests who are nervous about spice.
Tamarind Tang Version
Swap the lime juice for 1 tablespoon of tamarind paste dissolved in warm water. This gives a deeper, fruitier sourness that reminds me of coastal street food.
Extra-Hot Version
Add 4 to 6 bird's eye chilies with their seeds. Keep a glass of milk or a spoon of yogurt nearby.
Mild Family Version
Use red bell pepper for half the chilies, remove all seeds, and add an extra tomato. It still has the same savory depth, just far less fire.
What to Serve With Pilipili ya Kukaanga
Here is where the sauce really earns its place on the table. It works as a dipping sauce, a topping, a sandwich spread and a seasoning all at once.
With Fresh, Soft Flatbread
Warm, layered flatbread is the classic partner. Tear off a piece, scoop up a little sauce and eat it with a cup of spiced tea. If you want to make your own bread to go with it, my recipe for fluffy Kenyan chapatis gives you soft, flaky layers that carry the heat perfectly.
With Spiced Rice
A small spoonful beside a fragrant rice dish cuts through the richness and adds a hit of freshness. It is especially good with a coconut beef pilau cooked in the pressure cooker, where the warm spices and tender meat love a bright, spicy counterpoint.
With Grilled and Roasted Meat
Spoon it over grilled chicken, beef skewers, roasted goat, lamb chops or fish. Because the sauce is cooked, it clings to meat better than a raw salsa and does not make the crust soggy.
With Eggs and Breakfast
Try it on fried eggs, in an omelette, folded into scrambled eggs, or on toast with avocado. A teaspoon is enough to transform a simple breakfast.
With Fries, Potatoes and Snacks
It is outstanding on crispy fries, roasted potatoes, samosas, fried cassava and grilled corn. Mix a spoonful into mayonnaise or yogurt for an instant spicy dip.
With Soups and Stews
Stir a spoonful into lentil soup, bean stew or a simple tomato broth to add instant depth.
Comfort Pairings: Turning the Sauce Into a Full Meal
Because the sauce is intensely flavored, it shines when paired with something creamy, starchy or mild. Soft, coconut-rich dishes are a natural fit. A warm bowl of creamy coconut nduma, for example, becomes a different dish entirely when you add a small dot of fried chili on top, because the heat plays against the sweetness of the coconut. The same principle works with plain boiled rice, mashed cassava, sweet potatoes and plantains.
If you are cooking for a crowd, set out the sauce in a small bowl with a spoon and let everyone control their own heat. It is the easiest way to keep both spice lovers and spice-cautious guests happy.
Spicy Rice Dishes That Love a Chili Sidekick
Layered, aromatic rice dishes pair beautifully with a bright, hot sauce. When I make my chicken biryani, I always serve a small dish of fried chili on the side with a cooling cucumber and yogurt salad. The contrast between rich, spiced rice and sharp, fiery sauce is exactly what makes each bite interesting.
Storage, Safety and Shelf Life
Good storage habits keep your sauce delicious and, more importantly, safe. This is the section that earns trust, so please read it before you fill your jars.
How Long Does It Keep?
Fridge: up to 7 days in a clean, airtight jar with a thin layer of oil on top.
Freezer: up to 3 months. Freeze in ice cube trays, then transfer the cubes to a freezer bag so you can thaw one portion at a time.
Room temperature: do not leave it out for more than 2 hours.
Food Safety Notes
Always use sterilized or very clean, completely dry jars. Moisture encourages mold.
Use a clean, dry spoon every time you scoop. Double dipping introduces bacteria.
Keep the surface covered with a thin film of oil. It helps slow spoilage but does not make the sauce shelf-stable.
This recipe has not been formulated for canning. If you want a shelf-stable version, follow a tested home-canning method from a recognized food safety authority, because low-acid mixtures need properly controlled acidity.
If the sauce smells sour in an unpleasant way, shows mold, or has bubbles, throw it away.
Reheating
You can eat the sauce cold, but warming a spoonful in a small pan with a splash of water or a little extra oil revives the aroma and makes it spreadable again.
Troubleshooting: Common Mistakes and Easy Fixes
Even simple recipes can go sideways. Here is how to rescue your sauce.
The Sauce Is Too Hot
Stir in a diced tomato, a spoon of tomato paste, a little sugar, or a spoonful of yogurt or coconut milk. Another trick is to double the batch with the same quantity of onion and tomato but no additional chili.
The Sauce Tastes Bitter
Bitterness usually comes from burnt garlic or over-fried chili seeds. A pinch of sugar and an extra squeeze of lime can mask mild bitterness, but a badly burnt batch is best started again.
The Sauce Is Too Watery
Simmer it uncovered for a further 5 to 10 minutes until the liquid has reduced and the oil starts to separate.
The Sauce Is Too Oily
Spoon off the excess oil, or stir in a little more chopped tomato and cook until it is reabsorbed. Remember that some oil on the surface is normal and actually helps preservation.
The Color Looks Dull
A dull brown color usually means the tomatoes were underripe or the sauce was overcooked. Add a teaspoon of tomato paste and a pinch of paprika to bring the red back.
Nutrition and Health Notes
Chili peppers contain capsaicin, the compound responsible for heat, and are a source of vitamin C. Tomatoes provide lycopene, and garlic and ginger have long been used in traditional cooking. Because this sauce is eaten in small spoonfuls, it adds a lot of flavor for relatively few calories, though the oil does contribute fat. As a rough estimate, one tablespoon contains about 40 to 60 calories, depending on how much oil you use. If you have a sensitive stomach, acid reflux or irritable bowel syndrome, introduce spicy foods cautiously and speak with a healthcare professional if you are unsure.
Expert Tips for Better Flavor
Balance, balance, balance. Great fried chili is not just hot. Think about salt, sweetness, acidity and fat in equal measure.
Cook it low and slow. Rushing the tomatoes gives you a raw, sharp taste.
Season in layers. A pinch of salt with the onions, another with the tomatoes, and a final adjustment at the end.
Make it a day ahead for parties. The flavor deepens overnight.
Label your jars. Write the date on the lid so you know when to use or toss it.
Final Thoughts
Making Pilipili ya Kukaanga is one of the simplest ways to bring East African flavor into everyday cooking. With a handful of fresh ingredients and about half an hour, you get a jar of heat and brightness that improves nearly every savory dish. Start with the base recipe, taste as you go, and then adjust the chilies, lime and oil until it tastes like your kitchen.
Here is your action plan: make a small batch this weekend, serve it three different ways during the week, and note which pairing your family loves most. Then freeze the leftovers in cubes so you always have a spoonful ready. If you try it, I would love to hear how it turned out in the comments below.
Frequently Asked Questions
What does Pilipili ya Kukaanga mean?
It is Swahili for "fried chili." The phrase describes a sauce or relish made by frying chilies together with onions, garlic and tomatoes until thick and fragrant.
Can I freeze it?
Yes. Freeze it in an ice cube tray, then move the frozen cubes into a freezer bag. Thaw only what you need in the fridge or warm a cube directly in a pan.
What can I eat it with?
It goes well with flatbreads, rice dishes, grilled meat, fish, eggs, fries, sandwiches, soups and roasted vegetables. It also makes a great base for stews and a quick marinade for chicken.
Is it vegan and gluten-free?
The basic recipe uses only vegetables, oil and seasonings, so it is naturally vegan and gluten-free. Always check labels on any store-bought ingredients like tomato paste.
What is the best oil to use?
A neutral oil such as sunflower, canola or vegetable oil lets the chili flavor shine. Avoid strongly flavored oils unless you want their taste to dominate.
Can kids eat it?
Children are often more sensitive to spice. Make the mild family version with bell pepper and no seeds, and serve a very small amount on the side.